Create Screenshots in PowerPoint
Most of us have to create PowerPoint presentations from time to time, whether at work or when studying. PowerPoint is a very versatile and practical tool for creating presentations that visually and powerfully support your points. However, many users are overwhelmed by the program’s almost infinite possibilities.
It’s easy to create impactful presentations with PowerPoint, and it’s well worth learning how to use some of the very practical features of PowerPoint. In this article we would like to introduce you to a particularly helpful and versatile function: creating screenshots directly in PowerPoint and inserting them into your presentation.
Pictures are great for livening up a PowerPoint presentation a bit. PowerPoint also allows you to insert your own screenshots – for example, they’re perfect for illustrating the process flow of a manual.
The screenshot can be a section of a program or a picture of your own desktop. Everything that appears on your own screen can be saved as a screenshot and added to your PowerPoint presentation. There’s a screenshot function built into PowerPoint especially for this purpose. This makes it quick and easy to insert screenshots into the presentation. This function also makes it easy to create and insert an image from a PDF file.
Screenshots in PowerPoint – It’s Just So Simple!
If you want to insert a whole window, start by opening the window. Make sure that it is not minimized and remains open in the background. Use the taskbar to switch to the open PowerPoint presentation you want the window to be inserted into. Select the Insert tab and open it. Now select Screenshot in the Images section.
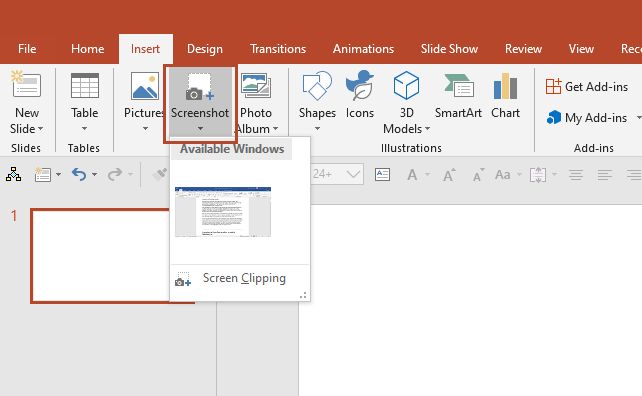
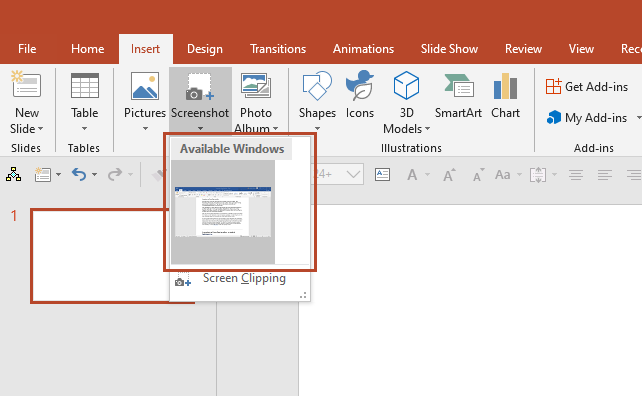
This brings up Available Windows, showing all the windows that are currently open. You can now insert the window of your choice into the presentation as a screenshot, simply by selecting it. The complete window then appears on the open slide of your presentation – it couldn’t be easier!
Inserting a Screen Clipping in PowerPoint
It is also possible to insert an image section into the presentation. To do this, you first need to open the window from which you want to choose a section. Again, remember not to minimize the window but to leave it open, so you can select the area you need later. Once the window you want is open, switch to your PowerPoint presentation using the taskbar.
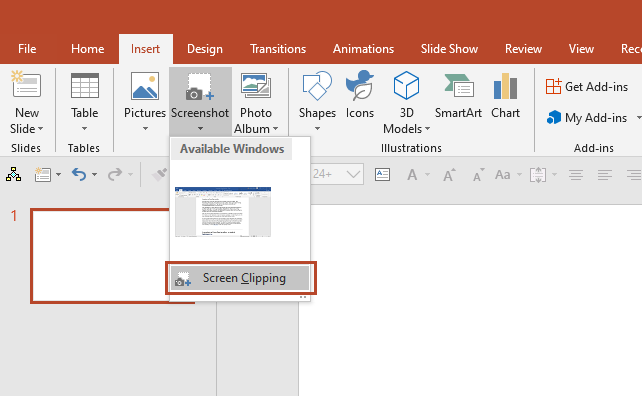
As above, go to the Insert tab, click on Screenshot and choose Screen Clipping. PowerPoint will switch to your screenshot and fade it. To select the clipping you want, just drag a new window over the bit of the screenshot you want to add. This screen clipping will then be added to the active slide in your presentation.
Inserting Screenshots with the Print Screen Key
Another way to create a screenshot is the Print Screen (prt sc) key on your PC; this saves the whole screen to your clipboard, so you just use Insert or Ctrl + V to copy it to another program, such as PowerPoint. If you want, you can edit the screenshot in Paint or other programs before inserting. Then just insert it where you need with Ctrl + V.
If you have a Mac, there’s no dedicated button, but the same thing can be achieved by pressing Shift, Command and 3 at the same time. The screenshot will save to your desktop.
This is a very simple and common way to create screenshots.
Use the Windows Snipping Tool to Create Screenshots in PowerPoint
On a Windows computer, you also have the option of the Snipping Tool (Vista and later versions). To use it, select the Start button (or tile interface), then type “snipping tool” and select it in the search results. Just click on it to start it.
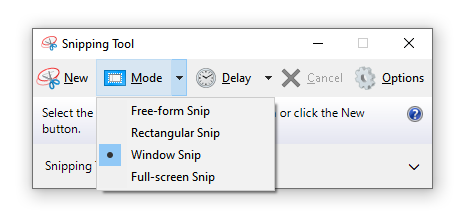
The Snipping Tool offers various functions. To choose the type of snip you want, select Mode (or the arrow next to New, in older versions of Windows); you can do Free-form, Rectangular, Window, or Full-screen Snip. If you want a free-form or rectangular snip, use your mouse to select the area that you want to capture.
After the mouse button is released, the selected area appears in a small window. Above the bar, different tools appear with which individual areas in the created screenshot can be marked. The screenshot can be saved by clicking on the diskette symbol. After saving, it can be opened in PowerPoint like a normal picture and added to the presentation.
The icon, which shows two pages on top of each other, is called copy, and takes the new screenshot directly into the clipboard, which makes it especially easy to insert it quickly.
Edit and Arrange Your Screenshots
Your screenshots can then be edited as desired. For example, you can adjust the size of the screenshots, and add a picture frame or other picture effects. There are also many other design options. They are worth trying out so that your screenshots align perfectly with your presentation style.
If you insert screenshots directly into a slide you can also place text around the screenshot. Screenshots are especially useful when explaining how a program works, showing your audience exactly what to do.
Conclusion: Creating Screenshots in PowerPoint – So Many Options
We’ve outlined various options for screenshot creation in PowerPoint here. These mean you can liven up your PowerPoint presentation by inserting screenshots to clearly present facts. Inserting the screenshots, especially via the one-step function in PowerPoint, is very easy and can be done by anyone. But no matter which method you choose, you’re sure to love the results!


